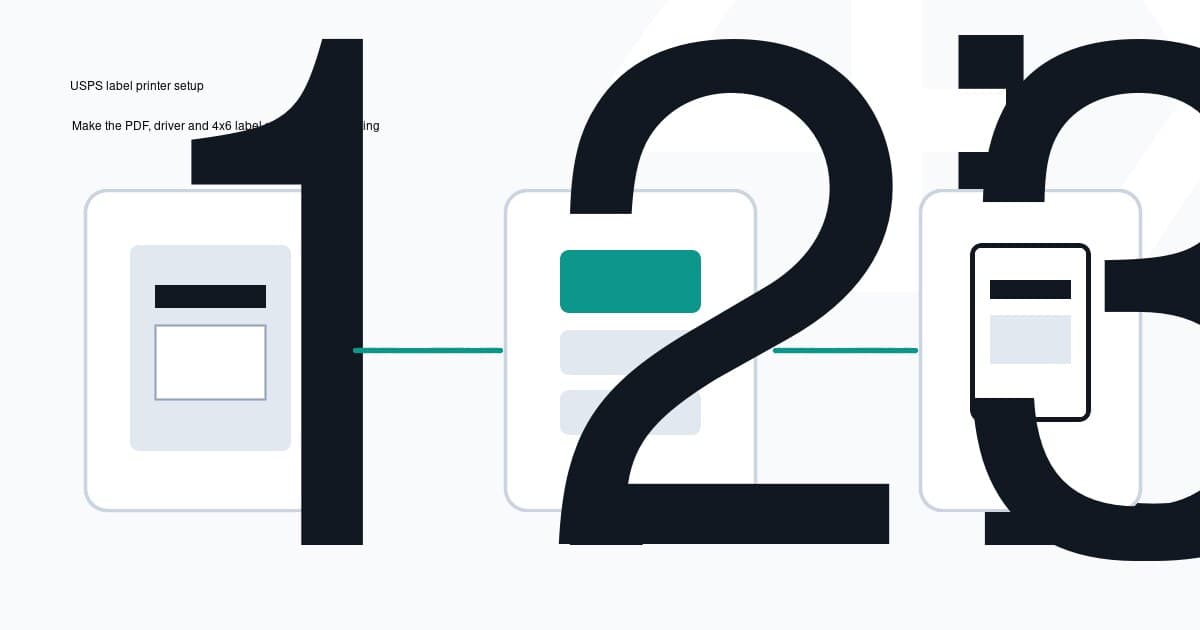
A USPS label printer should make shipping faster, not turn every parcel into a print-settings experiment.
The common mess looks like this: you buy postage, download the label, send it to a thermal printer, then get a tiny label, clipped barcode, sideways print or a blank strip of wasted labels.
The fix is usually simple. Make the USPS PDF, your printer driver and your physical 4x6 labels agree before you print.
In this article:
- The quick setup checklist
- Choose the right USPS label format
- Set the printer paper size to 4x6
- Print at actual size, not fit to page
- Fix tiny, cut off, sideways or blank labels
- USPS Click-N-Ship notes
- When an automatic PDF workflow helps
- Final USPS label printer checklist
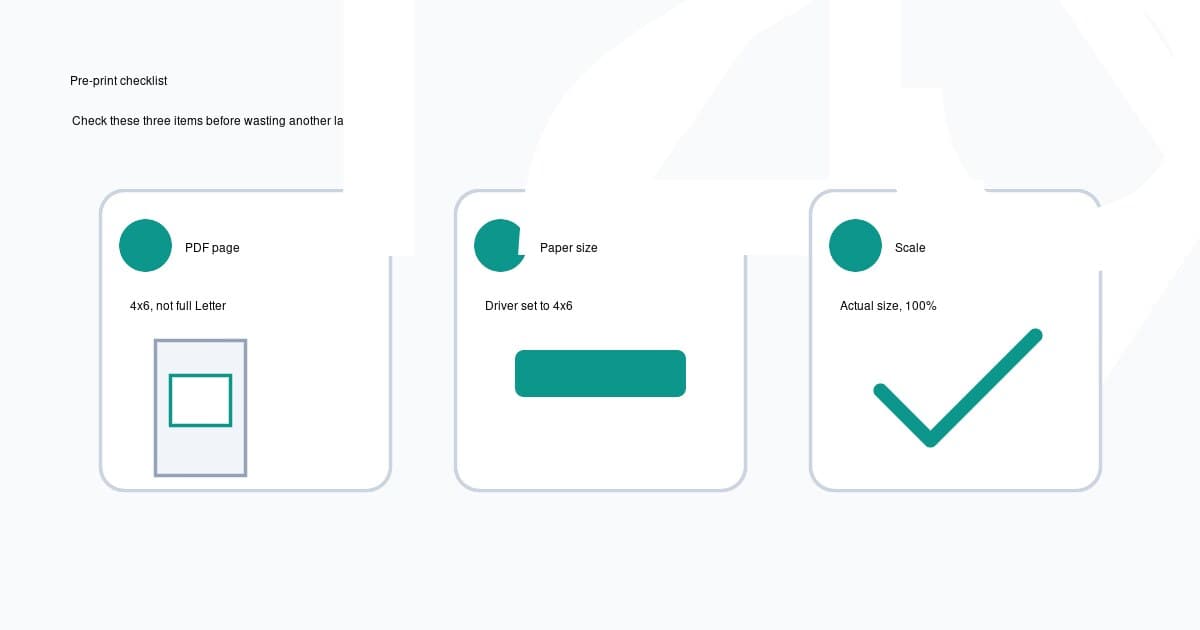
The quick setup checklist
If you only want the practical version, start here.
- Use 4x6 inch label stock, or the closest exact size your printer supports.
- Set your printer driver paper size to 4x6 inches.
- Download the USPS label PDF and check whether the page itself is 4x6 or Letter.
- If the PDF page is already 4x6, print at actual size or 100 percent.
- If the label sits inside a Letter page, crop or convert the label before sending it to the thermal printer.
- Turn off browser headers, footers, margins and automatic scaling.
- Calibrate the printer if labels drift, skip or stop between stickers.
That checklist matters more than the printer brand. Dymo, Zebra, Brother, MUNBYN, Rollo and other 4 inch thermal printers all fail in similar ways when the PDF page size and driver size disagree. If you are building the whole fulfilment setup from scratch, start with the small business shipping label printer setup guide, then use this USPS overview for carrier-specific PDF checks. If your packing desk includes a postal scale, the USPS scale and label printer setup walks through the weigh, buy, download, inspect and print sequence. Rollo owners can also use the Rollo shipping label printer setup guide to check 4x6 presets, calibration and scaling.
Choose the right USPS label format
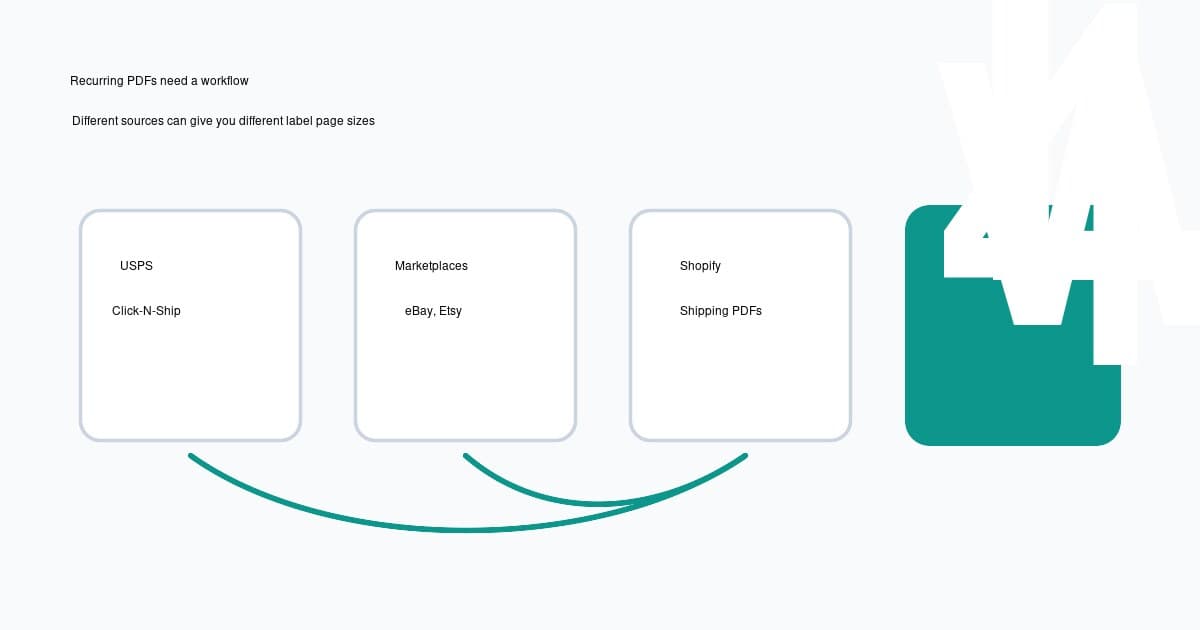
USPS labels can come from a few different places.
You might use USPS Click-N-Ship, a marketplace such as eBay or Etsy, Shopify Shipping, a postage platform, or a returns workflow. The source matters because each workflow can generate a slightly different PDF.
Before you blame the printer, open the PDF and check the page.
Good input for a thermal printer: the PDF page is already a 4x6 label, with the barcode and address filling the page in the right orientation.
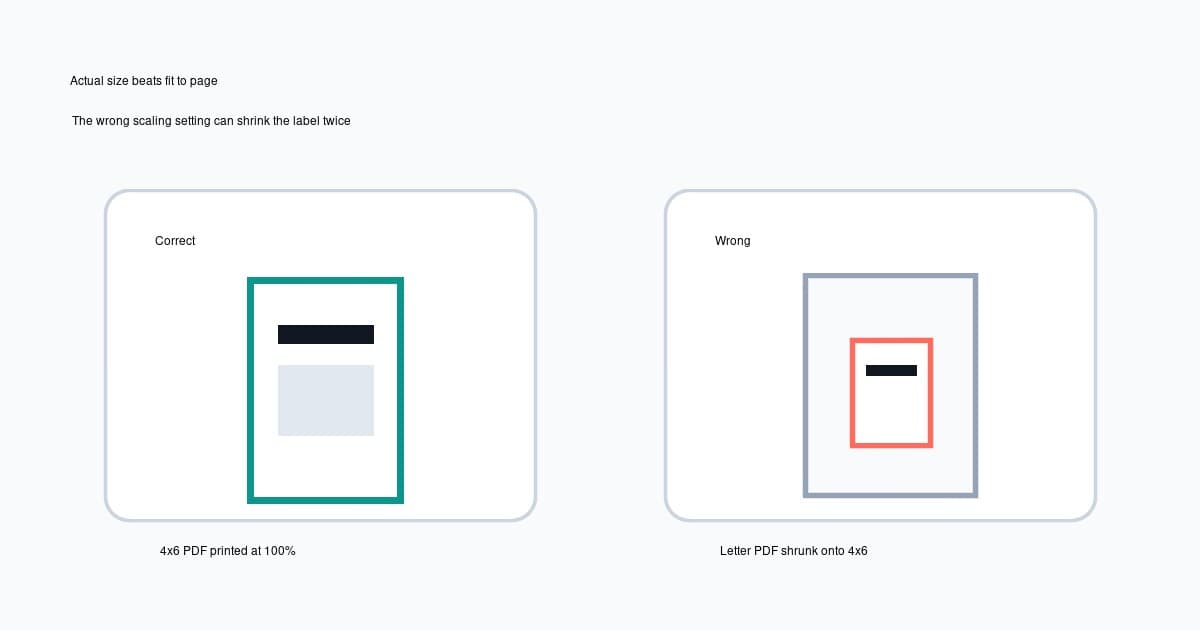
Bad input for direct thermal printing: the PDF page is Letter size, and the real shipping label is only part of that page.
A Letter PDF is fine for an office printer. It is not fine when you send the whole page to a 4x6 thermal printer and expect the driver to guess which rectangle you meant.
The printer will usually shrink the entire Letter page to fit the 4x6 label. That makes the actual USPS label tiny, because the label was already smaller than the Letter page before scaling.
Set the printer paper size to 4x6
Once the PDF format is right, set the printer driver to match your physical labels.
Use this setup pattern.
| Setting | What to choose | Why it matters | |---|---:|---| | Paper size | 4x6 inches | Matches common USPS thermal label stock | | Metric equivalent | 101.6x152.4mm | Useful if the driver uses millimetres | | Scale | 100 percent or actual size | Avoids accidental shrinking | | Orientation | Match the PDF preview | Prevents sideways or clipped labels | | Margins | None or minimum | Keeps barcode quiet zones clear | | Media type | Direct thermal labels | Matches the roll in most 4 inch label printers |
If your driver only lists metric sizes, create a custom paper size that matches the roll. Do not pick A6 just because it looks close. A6 is about 105x148mm, while 4x6 is about 101.6x152.4mm. That small difference can clip barcode edges or shift the label over time.
On Windows, check the printer preferences and the print server paper-size settings if your custom size keeps disappearing. On macOS, check both Page Setup and the final print dialog.
Print at actual size, not fit to page
The most expensive checkbox in shipping-label printing is usually some version of “fit to page”.
Those options sound helpful, but they often resize the label twice.
Turn off settings like:
- Fit to page
- Shrink oversized pages
- Scale to printable area
- Choose paper source by PDF page size
- Browser headers and footers
- Default margins
Use actual size, 100 percent scale or no scaling when the PDF is already 4x6.
If the preview shows a full 4x6 label and the barcode has breathing room at the edges, print one test label. If that test label is centred and scannable, save the preset so the browser or PDF viewer does not forget it tomorrow.
Fix tiny, cut off, sideways or blank labels
Here is the symptom-first version.
USPS label prints too small
This usually means you printed a Letter page onto a 4x6 label.
Open the PDF. If the label is sitting inside a larger page, crop or convert the label first. Then print the cropped 4x6 version at 100 percent.
If the PDF is already 4x6, check for fit-to-page scaling. Turn it off and test again.
Barcode is cut off
A cut-off barcode usually means the paper size is slightly wrong, the orientation is wrong, or margins are being added.
Set the driver to the exact roll size, then print actual size. If the printer has been loaded with a different label stock, update the driver rather than forcing the PDF to fit.
Label prints sideways
Sideways labels usually come from an orientation mismatch.
Check portrait versus landscape in the print preview. Some drivers describe a 4x6 label by width first, while others describe it by feed direction. Do one test print before sending a batch.
Blank labels feed through
Blank labels are often calibration or media issues, not USPS issues.
Run the printer calibration from the driver or hardware button sequence. Check that the roll is direct thermal, loaded the correct way around and detected by the gap or black-mark sensor.
Labels drift lower with each print
This usually points to calibration, label gap detection or the wrong paper size.
Calibrate the printer, then make sure the driver size matches the physical label. If you print a batch from a multi-label PDF, test the first two labels before trusting a full run.
USPS Click-N-Ship notes
USPS Click-N-Ship is the official USPS online postage workflow. USPS also documents Click-N-Ship basics, which is useful if you are still setting up the account side.
For printer setup, the key point is still the PDF output.
If you want a fuller walkthrough for that specific flow, use the USPS Click-N-Ship 4x6 label printer workflow before changing driver settings or cropping the PDF.
If your Click-N-Ship or connected workflow gives you a thermal-label-friendly option, use it. If it gives you a Letter PDF, treat it as an office-printer file unless you crop or convert it first.
The same rule applies to marketplace PDFs. LabelChop can help with compatible PDFs from USPS, eBay, Shopify, Etsy and similar workflows, but it is not an official USPS integration and it does not replace postage purchasing.
When an automatic PDF workflow helps
Manual setup is fine if you print one label a week.
It gets old when you ship every day and different platforms give you different PDFs. One download is already 4x6. The next is a Letter page. Another marketplace export has the label in a different position. Then the browser remembers yesterday's bad scaling setting.
That is the workflow LabelChop is built for.
LabelChop watches a folder, detects compatible shipping-label PDFs, crops or resizes awkward pages to 4x6 or 100x150mm output, then sends them to your thermal printer or saves the fixed label. It helps with PDFs from carrier and marketplace workflows rather than acting as an official USPS integration.
If you are still testing manually, try the free A4 to 4x6 shipping label converter. If the recurring pain is folder-to-printer automation, see the watch folder label printing guide or check LabelChop pricing.
If the problem is broader than USPS, the shipping label printing problems guide covers off-centre, blank, blurry and cropped labels across common carrier PDFs.
Final USPS label printer checklist
Before printing a batch, run this once.
- The PDF page is 4x6, or the label has been cropped from Letter first.
- The printer driver paper size is 4x6 inches or the exact roll size.
- Scaling is actual size or 100 percent.
- Browser headers, footers and margins are off.
- Orientation matches the preview.
- The printer has been calibrated after loading a new roll.
- One test label scans cleanly before you print the rest.
If those are true, the printer should stop feeling random.
If they are not true, do not keep wasting labels. Fix the PDF size first, then the driver size, then the printer calibration.