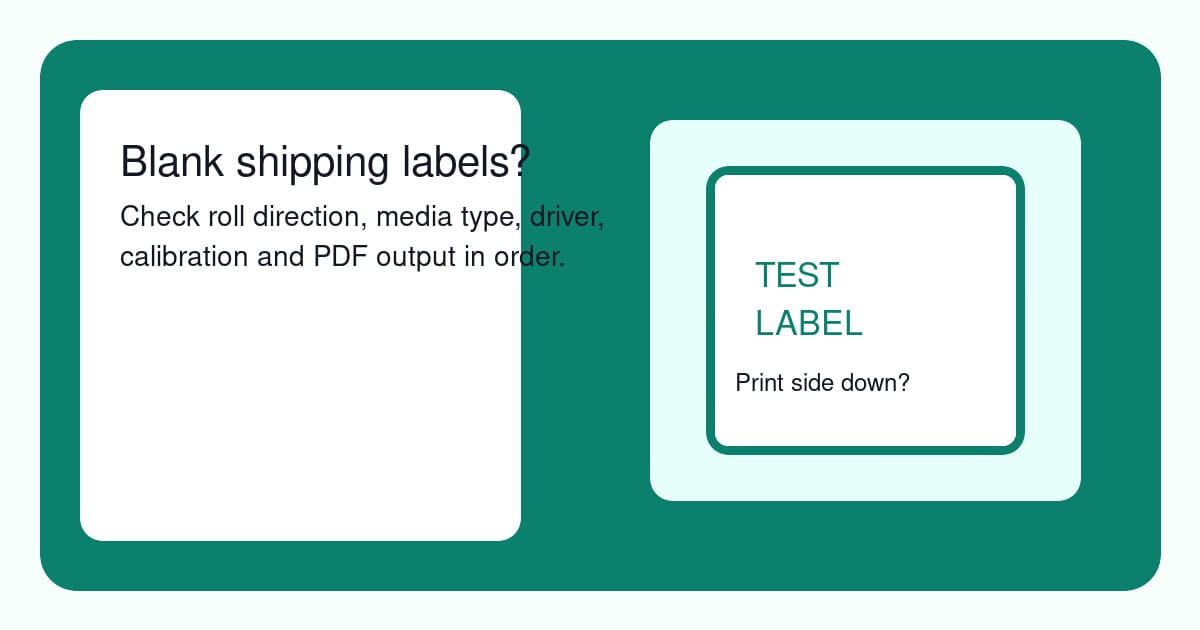
A thermal printer printing blank labels is frustrating because the printer looks alive. It feeds the label. It makes the usual noise. Then a perfectly white label slides out while your orders wait.
The fix is usually simple, but only if you test in the right order. Blank labels can come from the label roll, the media type, the printer driver, calibration, darkness settings, or the PDF you are trying to print. Guessing across all of them wastes labels fast.
This checklist starts with the physical label roll, then moves through the driver and PDF workflow. If your labels are printing but the content is tiny, use the shipping label printing too small guide. If the label prints sideways, use the shipping label orientation guide. If part of the label is missing, use the shipping label cut-off guide.
In this article:
- Fast blank label checklist
- Start with the label roll
- Check direct thermal versus thermal transfer labels
- Print a driver self-test before blaming the PDF
- Fix driver, paper size and darkness settings
- Calibrate the label gap or black mark sensor
- When only shipping-label PDFs print blank
- Dymo, Zebra, Brother, MUNBYN and Rollo checks
- Where LabelChop fits after the printer works
- One clean test before printing orders
Fast blank label checklist
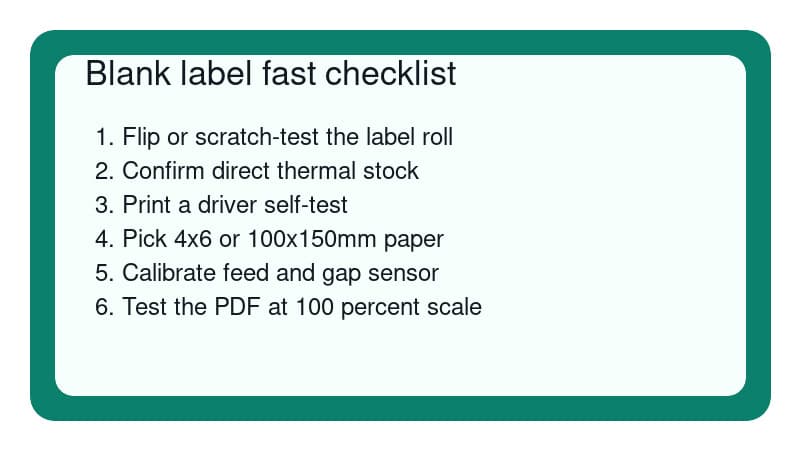
If you need to get orders out today, start here.
- Turn the label roll over or reload it so the coated side faces the print head.
- Scratch the label surface with a fingernail or coin. The printable side should darken.
- Confirm the labels are direct thermal labels if your printer is a direct thermal model.
- Print a printer self-test or driver test page without using your shipping-label PDF.
- Select the correct printer driver, not a generic text or receipt printer driver.
- Set paper size to 4x6 inches or 100x150mm for standard shipping labels.
- Increase darkness one step if the print is extremely faint.
- Run calibration so the printer can detect each label gap or black mark.
- Print one simple test label before trying a carrier or marketplace PDF.
- If the printer test works but the PDF is blank, troubleshoot the PDF viewer and print settings.
Do not keep printing the same order label while changing random settings. Use a test label or cancelled sample file until the output is predictable.
Start with the label roll
Blank labels are often caused by the roll facing the wrong way.
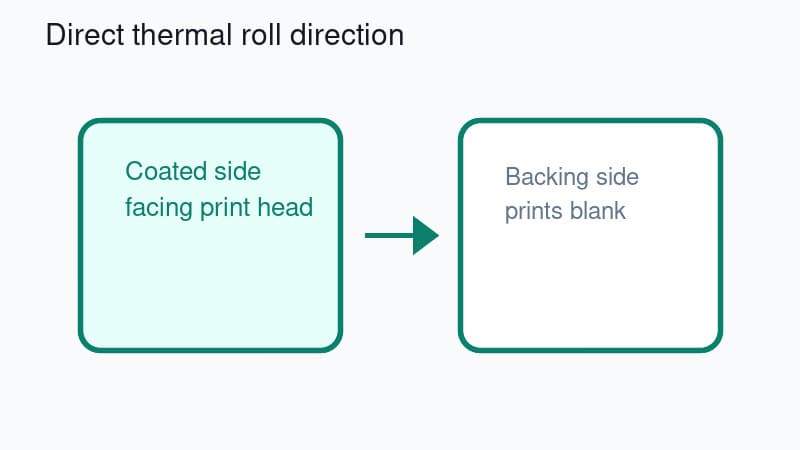
Direct thermal labels have a coated side that reacts to heat. The print head touches that coated side and makes the text, barcode and address appear. If the backing side faces the print head, the printer can feed normally but nothing appears.
Do a quick scratch test. Scratch both sides of one spare label with a fingernail or coin. The side that leaves a grey or black mark is the printable side. That side needs to face the print head, not the outside of the printer cover by default.
Roll direction is not universal. Some printers want labels feeding from the top of the roll. Others are fine with fanfold labels or an external holder. The only rule that matters is where the coated side touches the print head.
If your printer has just been moved, cleaned, or reloaded after a jam, this is the first thing to check.
Check direct thermal versus thermal transfer labels
A lot of ecommerce sellers buy 4x6 labels by size and forget to check the print technology.
Most desktop shipping-label printers used by small sellers are direct thermal. They do not use ink, toner or ribbon. They need direct thermal label stock with a heat-sensitive coating.
Thermal transfer printers use a ribbon. Thermal transfer label stock can look similar, but a direct thermal printer may feed it through blank because the surface is not made to darken from the print head alone.
Plain paper or laser label sheets will also print blank in a direct thermal printer. The printer is not broken. It is heating a surface that does not react.
If you are not sure what you bought, check the label packaging for phrases like direct thermal, thermal transfer, ribbon required, 4x6 direct thermal, or 100x150mm direct thermal. For shipping labels on Dymo LabelWriter 4XL, Zebra desktop direct thermal models, Brother QL wide-label models, MUNBYN, Rollo and similar printers, direct thermal stock is usually what sellers expect.
Print a driver self-test before blaming the PDF
Separate printer hardware from the shipping-label file.
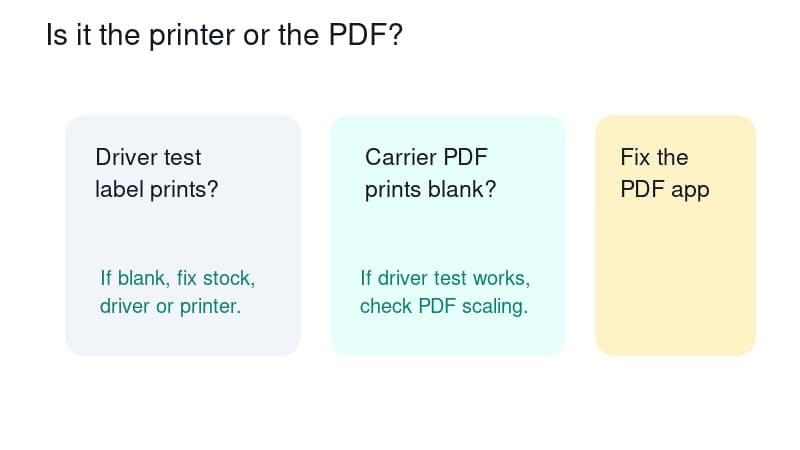
A printer self-test or driver test page is useful because it bypasses your carrier PDF, browser, marketplace download and PDF viewer. If the printer cannot print its own test, the problem is physical stock, driver, media setup, calibration or hardware.
If the self-test prints dark text or bars, the printer can make marks. That means a blank shipping label is more likely coming from the app you printed from, the PDF page, a white image layer, scaling, or the wrong printer being selected.
Use this split.
| Test result | Likely cause | Next step | |---|---|---| | Self-test is blank | Roll side, media type, driver, darkness, calibration or hardware | Fix the printer setup first | | Self-test prints, PDF is blank | PDF viewer, browser, print mode or page rendering | Try another viewer and print at 100 percent | | Test page prints faintly | Darkness, speed, dirty print head or weak stock | Increase darkness and clean the print head | | One label prints then blanks continue | Calibration or gap sensor | Recalibrate with the loaded label stock |
This avoids the classic trap where sellers keep re-downloading Royal Mail, USPS, Australia Post, eBay, Shopify or Etsy labels when the real issue is the roll facing the wrong way.
Fix driver, paper size and darkness settings
Once the roll and stock are correct, check the driver.
On Windows, open the printer preferences for the actual thermal printer model. Avoid printing through a generic printer driver unless the manufacturer specifically tells you to. A generic driver can feed labels but fail to send the right commands for darkness, media handling or page size.
Set paper size to 4x6 inches or 100x150mm for a standard shipping label. If your driver offers both 4x6 and 100x150mm, either can work. Pick one, print one test, then leave it consistent.
Check darkness or density next. A darkness value set too low usually creates a faint label rather than a totally blank one, but it is still worth checking after the roll direction and media type are right. Increase it one step at a time. Too much darkness can make barcodes thick and harder to scan.
Check print speed as well. Slower speed can help weak or cheap labels darken more cleanly. It will not fix the wrong label side, but it can turn a barely visible output into a usable one.
On macOS, check both the printer settings and the app print dialog. Preview, Chrome, Acrobat and browser-based shipping tools can each remember a different preset.
Calibrate the label gap or black mark sensor
Calibration tells the printer where each label starts and ends.
A calibration problem usually causes skipped labels, half labels, labels stopping in the wrong spot, or a blank label between printed ones. It can also look like blank printing when the printer advances past the area you expected to print on.
Run calibration after you change label size, switch from roll to fanfold, clear a jam, move the sensor, or load labels from a different supplier.
For gap labels, the printer needs to see the space between labels. For black-mark labels, it needs to see the mark on the backing. If your stock type does not match the driver setting, calibration can fail even though the roll is loaded correctly.
Clean the sensor path if the printer has been sitting on a packing bench. Label dust, adhesive and tiny paper scraps can confuse the sensor.
When only shipping-label PDFs print blank
If the driver test page works but the carrier PDF prints blank, move up the workflow.
First, open the PDF in a different viewer. Try the system PDF viewer and a browser print preview. Some web previews render label layers differently, especially when a marketplace or carrier generates a PDF with image layers, vector layers or embedded fonts.
Second, download the PDF and print the file, rather than printing from the browser tab. Browser print flows can accidentally print the website frame, a blank preview state, or a page before the label finishes loading.
Third, check the selected printer in the final print dialog. It sounds obvious, but a PDF can be sent to a virtual PDF printer, old office printer or disconnected queue while the thermal printer feeds from a previous job.
Fourth, print at actual size or 100 percent. Fit-to-page should not make a label blank by itself, but it can combine with a bad page size, wrong orientation or unsupported rendering mode and produce confusing output.
Finally, check whether the source file is really a label page. A4, Letter, A6, 4x6 and 100x150mm workflows all exist across carriers and marketplaces. Some domestic MyPost Business flows can output A6 or one-label-per-page labels, while other carrier, marketplace, international or old-download cases can still leave sellers with awkward PDFs. Do not assume every blank output is the same carrier problem.
Dymo, Zebra, Brother, MUNBYN and Rollo checks
The same logic applies across most small ecommerce thermal printers, but each brand has a few common patterns.
For Dymo LabelWriter models, make sure the roll is compatible with the printer and loaded so the thermal side faces the print head. Dymo printers can be sensitive to label recognition and stock type, so a roll that looks physically correct can still cause strange feed behaviour.
For Zebra desktop printers, confirm the media type, gap or black-mark mode, darkness and calibration. Zebra models are flexible, which is good for warehouses, but it also means a wrong media setting can survive across jobs.
For Brother QL wide-label printers, check the DK roll type and the selected label size in the Brother driver. If the roll is detected but the page size is wrong, you may see feed or scaling issues before you see a clean shipping label.
For MUNBYN and Rollo printers, check the driver, label size, print density and calibration after loading 4x6 labels. These printers are common in home ecommerce setups, where the printer might be moved, unplugged, shared between computers or fed from an external stack.
If you recently changed computers, reinstall the proper driver before chasing PDF fixes.
Where LabelChop fits after the printer works
LabelChop is not a replacement for a working printer driver, correct label stock or proper calibration.
The right order is simple. First, make the printer print a clean test label. Then make a normal 4x6 or 100x150mm PDF print correctly. After that, fix the annoying recurring workflow where your carrier, marketplace or shipping tool gives you an awkward A4, Letter, A6, 4x6 or 100x150mm PDF that needs cropping, resizing or repeated print settings.
That is where LabelChop helps. It watches a folder, detects compatible shipping-label PDFs, crops and resizes them for 4x6 thermal output, then prints or saves them without opening Acrobat or fighting the print dialog every time.
It can help with PDFs from workflows such as USPS, Royal Mail, Australia Post, eBay, Shopify, Etsy and other carriers or marketplaces when the PDF format is compatible. That is not an official integration with those platforms. It is a PDF workflow fixer for sellers who already have label files and want fewer manual steps.
If your current problem is blank labels, use the checks above first. If the test label prints fine but your real label PDFs keep arriving in awkward layouts, try the free A4 to 4x6 shipping label converter or the shipping label size checker before setting up the desktop automation.
For sellers who have already fixed the printer hardware and want the folder-to-printer workflow, the LabelChop pricing page shows the paid automation path after the free tools.
One clean test before printing orders
Before printing a batch, run one clean test.
Use a spare or void label if your carrier workflow allows it. Confirm the print is dark enough, the barcode is sharp, the address is readable, and the label starts and stops in the right place. Then print one real label and scan the barcode with your phone camera or carrier app if available.
If the first real label is blank, stop. Do not send ten more blank labels through the printer. Go back to the split test: self-test first, then simple PDF, then carrier PDF.
Blank labels feel like a printer mystery, but the cause is usually one layer out of place. Fix the physical roll first, prove the printer can print, then deal with PDF workflow problems last.